Food Blog

I've decided to start a food blog, where I will post pictures of things I make. I dream of someday being a chef, or having a catering business or a bakery. So because I love to cook so much I suppose I should start tracking what I make. Some of it turns out well and some of it is horrible. :) I'll post links to recipes (and also make note of changes I make to the recipe) when I get them from the web, and hopefully you'll find some good stuff to try as well.

As a warning, I'm no photographer. My husband enjoys taking pictures, but is rarely home in time to take them for me before the cries for dinner start, so I will likely end up taking most of the pictures. Please accept this as my most sincere apology for crummy pictures, and realize that it does look SO much better in real life. :)

Curling Orange Peel

Curling Orange Peel

So my younger brother is getting married, and my mom has been practicing some recipes to make for the reception. One of these is a recipe for lemon bars my younger sister brought home from school. I have to say this recipe is WONDERFUL and I quite enjoyed it. Especially the bit about how easy they are to make.

DSCF9500

But really - the story here is in the orange peel. In an attempt to appear decorative and fancy, we tried and tried to think of good ways to top the lemon bars last time I visited my family. We tried candied lemon peel, candy lemon slices, and making butterflies out of lemon slices. Nothing was quite right. And then my trip to visit my family ended, and home I came (armed with my sister's lemon bar recipe).

I made the lemon bars almost immediately after coming home (tells you how much I liked them!) and started out on a quest to figure out how to properly curl orange peels, because I LOVE that look and figured it would look nice on top of the lemon bars, adding some color and interest. I was certain there was some secret to curling citrus peel, and so I set about trying to find out just what that secret might be. But nobody was telling. I was frustrated. Finally, I found a comment on a web site somewhere out there in the wide world of the internet that led me to believe there really was no secret to curling the peel - you just twist it and, magically, it stays!

DSCF9516

In a bit of disbelief and irritation (I'd spent a very good long time looking for this elusive secret) I went to my fruit bowl and pulled out an orange. I used my citrus scoring tool (also possibly referred to as a channel knife though this I don't know for sure) and scored some nice lines of orange peel. I dutifully twisted them and placed them on and around my lemon bars. They looked lovely. I was impressed, but not yet convinced. Would they stay?

After we ate the lemon bars (trust me - that didn't take long, and I think I put down at least half the pan by myself before anyone else even got a shot at them) I put the orange twists into a bowl and stored them in my fridge. Now this must have been 2 weeks ago or something and I just pulled them out to check them - they are still curled! Amazing, isn't it? Apparently it's the juice in the citrus that makes them stay in shape when you twist them. Color me amazed. :)

DSCF9515

As a side note, I also used a microplane grater and grated a bit of orange peel onto the tops of the lemon bars for color. My kids tried to pick it off and eat it (they thought it was sprinkles) and decided then and there they don't like lemon bars. :) Once I convinced them to just take a bite of the bar with the grated orange on top, they changed their stories. Really, when you don't eat it plain, you can't taste the bitter peel at all on top of the bars - it's just a beautiful addition in color.

DSCF9506

One last note - if you plan to eat the orange that you're scoring, better peel it pretty fast after you score it. I left the scored orange in my fruit bowl (on my counter) and tried to use it a few days later and nearly broke my nails and cut my fingers open trying to get the peel off! It had all dried up. So a word to the wise - peel the orange and store the sections in the fridge until somebody wants to eat them!

DSCF9504

Cabin Cooking

Cabin Cooking

It has been entirely too long since I have blogged about food! It is high time I post some new stuff here for you to drool over. :)

This past weekend my husband and I went to stay at the family cabin for a few days, without the kids. It was a relaxing trip for us both - he did fix-it-up projects around the cabin and I helped with projects and cooked up a storm of yummy food that we normally wouldn't be able to have with the kids around.

My normal every-day cooking is good enough - my kids eat it without complaint (for the most part), my husband enjoys it and compliments it and me (as every good husband should), and it doesn't (usually) take too much time and concentration from me (which is a high priority around here with my 3 little ones). But the way I love to cook takes more time and effort than I can give it during my regular days, and often includes ingredients that my kids aren't excited to try. In a quick dish, I don't mind using stuff the kids aren't thrilled about, but when I spend a long time on a meal, the last thing I want to hear is "I don't LIKE this" or "this tastes FUNNY" or any number of other comments about why I didn't make spaghetti or pizza. So this cabin trip was the perfect time for me to make a few dishes that I have wanted to try for a while but haven't been able to find a good time or reason.

DSCF9273

The first night we had leftover chili that I brought from home, and it's a good thing I brought it because it was almost midnight before we were finally able to eat. But from then on, food was a whole different story.

DSCF9281

For breakfast Saturday morning, we had Lil' Citrus Muffins - a Pampered Chef recipe (and you can't go wrong using one of their recipes). Instead of making mini muffins, I made these regular sized. We've had them at home before (as mini muffins) and they were great (the kids loved them too) but I didn't have a mini muffin pan at the cabin so I modified the recipe a bit. Basically the only changes I had to make were less butter/sugar for the topping, and to cook them longer (obviously) since they were bigger. I also used light sour cream instead of the regular stuff. Instead of making 24 mini muffins it made 8 regular sized muffins. I baked them at 425 for 8 minutes then at 375 for another 20 minutes or so. I used a silicone muffin pan sprayed with cooking spray and they came right out after sitting for about 3 minutes in the pan to cool slightly.

For lunch on Saturday, it was Monte Cristo Sandwiches. We've had these at home before too, but the kids are unfortunately not fans. Kimball specifically requested we eat these up at the cabin, and I was happy to make them. They're easy and really, really good. I used mozzarella cheese and strawberry jam instead of the provolone and raspberry called for in the recipe. I've also found that, imho, 3 eggs is too many for making 4 sandwiches, and consequently to make 2 sandwiches, I only used 1 egg. That was perfect. I didn't have dry mustard so I just put some regular mustard in the egg mixture. I'm sure I also didn't use anywhere near as much meat as it calls for. It says to use "hearty bread" and I always use French or Italian bread for these - makes for some really great sandwiches!

DSCF9321

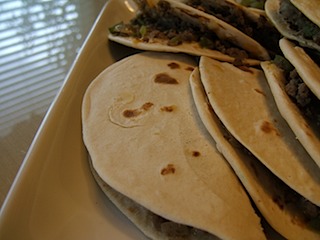
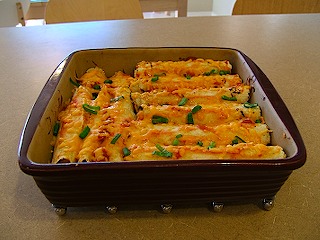
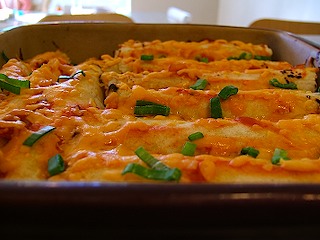
So for dinner on Saturday, we had Florentine Stuffed Chicken Breasts. This is another Pampered Chef recipe, from their "Stoneware Inspirations" cookbook. I've been wanting to try this one for a long time, but given the reasons I've already explained, this was the first time since I got the cookbook years ago that I've felt like it was worth the time. 

DSCF9322

They were absolutely wonderful, and I'd recommend them to anyone who likes chicken! The cheeses are the secret in these stuffed beauties, and add the perfect flavor to the filling as well as the crust.

DSCF9319

Kimball was kind enough to cook the veggies for me (but not really over the fire....)

DSCF9323

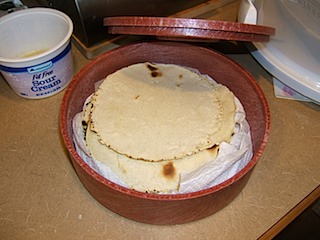
I don't have the small bar pan so I used the mini oval baker (which I just tried to find a link for and it's not there - maybe they've stopped selling this product!) and they fit perfectly, though because they were touching each other and the sides of the pan, the crust didn't brown on the sides. Still fabulous though, and very pretty to look at.

Sunday morning was omelets. Fillings included sausage, cheddar cheese, onions, red peppers, and mushrooms. I've recently learned to make omelets properly and have since been very pleased with them. Turns out they're not as hard as I thought, and the secret is in the pan. I get cooking emails from The Prepared Pantry and somewhere in there, I received instructions for making the perfect omelet. I looked on their site to try and find the instructions, but I can't for the life of me figure out where I found them the first time, so I'm just copying them here from my file. FYI - when I make an omelette, I usually use 2 eggs and cook it in my eight-inch pan - perfect size.


How to Make the Perfect Omelet


   1. Choose the right size of pan.  A three-egg omelet requires an eight-inch pan.  The pan should be nonstick.

   2. Whisk the eggs together in a bowl.

   3. Put a pat of butter in your nonstick pan.  Place it on medium-high heat.  On our stovetop, a high BTU gas burner, that’s 6 out of ten.  Heat the butter to just short of brown and swirl it around the pan.

   4. Pour the eggs into the hot pan.  Salt and pepper the eggs.

   5. Scramble the eggs with a soft silicone spatula scraping the bottom and sides of the pan.  The eggs will cook quickly and curds will form.

   6. When the eggs approach the consistency of cottage cheese with mostly solids but some liquid egg, stop stirring.  Use the spatula as a paddle to pat the eggs down into an even layer.  Let the eggs continue cooking until the liquids are set and the top of the omelet is cooked.

   7. Place the fillings in a row across the omelet just off to one side.  For most fillings, you will want them pre-cooked.

   8. The omelet should slip around in the pan without a hint of sticking.  Move the pan to a plate, tip the pan on angle over the plate, and gently shake the omelet onto the plate filling side first.

   9. When the omelet is about half onto the plate, twist the pan with your wrist folding the remaining omelet over that on the plate.  The omelet should be folded over with the bottom edge protruding about one-half inch. 


Your omelet should be golden brown and puffy with the interior set and any cheese melted.  A three egg omelet should cook in five minutes or less.  For larger omelets, use larger pans.


Sunday for lunch we had Hot Cheesy Spinach Dip. This is a recipe I have on a card that I got from I unfortunately can't remember where. I suspect it was one of those packages of recipe cards that come in the mail from time to time. It does say "Party Favorites" in the corner of each card, so maybe that will give you a clue if you want to go find them. This was a great recipe and I enjoyed it quite a bit. I did use fresh spinach and wilted it before adding to the recipe (place in microwave safe bowl and cook on high for 3 or 4 minutes or until wilted). I left out the water chestnuts as I'm not a fan of those. Also, I never buy half-and-half and so instead I used 50% whipping cream and 50% milk as a substitute. I'm sure it's not exact but it works. I halved the recipe, and also sliced up about 3/4 of a (store purchased - gasp) baguette and toasted the slices by placing them on a cookie sheet and baking for 5 minutes at 350. I'm pretty sure this is supposed to be an appetizer (the recipe serves 8, and I halved it so we had 4 servings) but we ate it as a meal. I loved it!

Sunday dinner was sandwiches in the car on the way home. But as a treat, I had brought some of the Whole-Wheat Brownies that I made a few weeks ago and froze as an experiment to see if they would still taste good after having been frozen. The answer? YES. VERY YES. In fact, I'd say they tasted better after being frozen than they did before freezing, even after letting them sit for 24 hours after baking as the recipe suggests. I love these brownies, and wish I could eat them all when I make them. I do deviate from the recipe a touch: slightly less butter (probably about 3/4 cup instead of 1 cup), 3 eggs instead of 4, hot chocolate powder instead of espresso powder (I'm not a coffee drinker), and regular cocoa + 3/8 tsp baking soda instead of Dutch process cocoa.

So there you have it - my meals for the few days we were at the cabin. I'm impressed I was able to cook these things bringing only a few of my specialty tools up to the cabin (lemon zester, garlic press, oval baker, non-stick 8" frying pan, and meat tenderizer). Turns out the kitchen there is nearly as full as mine here at home! Ok - maybe not really, but it was full enough for my purposes. :)

Brownie Candy Cane Pops

Brownie Candy Cane Pops

My dad's family always has a Christmas party and I am pretty sure I'm always on dessert patrol for the party (which is fine with me - I'm best at desserts and bread anyway!). This year, in addition to my traditional Oreo cookies, I tried a new dessert - Brownie Candy Cane Pops. The stick is a candy cane, while the "pop" is a brownie, covered in almond bark and then rolled in crushed candy canes.

candy cane candies

Since I'm not a fan of mint, I didn't actually try these (which is fine - I had way too much other junk anyway) but I heard they turned out ok. Nobody was dying to eat them, though, so I probably won't make them again. They were WAY more work than they were worth, especially for something I don't really like all that much.

candy cane candies2

Next year I'll stick with the Oreos. :)


Candy Cane Brownie Lollipops

Ingredients:

1 pkg (18-21 oz) fudge brownie mix (plus ingredients to make brownies)
24 candy canes
10 oz chocolate-flavored almond bark
Additional decorations such as red jimmies (optional)

Directions:

    1. Line Medium Sheet Pan (or 9-in. by 13-in. metal pan) with a 13-in. piece of Parchment Paper; lightly spray with
    nonstick cooking spray and set aside. Prepare brownie mix according to package directions; pour batter into pan.
    Bake 30 minutes or until wooden pick inserted in center comes out with moist crumbs attached. Remove from
    oven to 
    Stackable Cooling Rack; cool 20 minutes or until still slightly warm.
    2. Meanwhile, cut straight ends of candy canes off to form 4½-in. sticks using 
    Utility Knife. Place candy cane tops
    into resealable plastic bag and crush using flat side of 
    Meat Tenderizer; set aside.
    3. Using 
    Medium Scoop, scoop brownie into 24 rounded scoops, packing brownie into scoop using hands.
    (Entire brownie will be used.) Roll brownie scoops into smooth balls. Insert candy cane sticks into centers of
    balls, mounding brownie around each stick to secure. Pinch each brownie ball where candy cane and
    top of ball meet.
    4. Place almond bark into 
    Small Batter Bowl; microwave according to package directions until smooth. Spoon
    melted bark evenly over each brownie ball, turning to coat completely. Be sure to coat where candy cane stick
    meets brownie ball. Allow excess bark to drip off. Dip into reserved crushed candy canes or jimmies and stand
    upright on a piece of Parchment Paper. Repeat with remaining almond bark, lollipops and crushed candy. Let
    stand until set. Place into miniature cupcake liners.

    Yield: 24 servings

    Cook's Tips: Although the edges of the brownies are crusty, they don't need to be discarded. Simply scoop the edges
    along with the center, and they'll soften as they stand. If desired, lollipop sticks or stick candies can be substituted for the candy canes.
    Wrap lollipops in cellophane, tie with ribbon and use as table décor, place cards or take-home goodies for a special
    holiday touch.


    From 
    The Pampered Chef® Festive Holiday Desserts Recipe Collection.
    ©The Pampered Chef, Ltd., 2008

Christmas Braids

Christmas Braids

For Christmas each year, I like to make something (usually food) (ok I mean always food) and give it to my neighbors and friends. This year I went blackberry picking with my sister and her husband, and so during the summer I made blackberry jam. So as Christmas approached I thought it would be fun to make some small loaves of bread to give with the jam. Since I've been practicing my breads, I thought I'd try a few new shapes (the dough was a transitional (meaning half wheat, half white) sandwich loaf bread). My favorite was the braid, as seen below.

DSCF8820

It's been so long since I made them and I've made so many things since, that I can't remember how long I baked them. It seems like it wasn't very long, though - maybe 20 minutes, tops?

DSCF8826

I received so many compliments on these little braids that I think I'll probably have to make them again to give away. They're just so pretty, and really very very simple to make. As bread shaping goes, I'd say this is a moderate difficulty, but certainly on the easier side of moderate.

DSCF8828

Snowman Cake

Snowman Cake

Today is Cambria's birthday, and in her honor I made a snowman cake. This was inspired by the recipe from The Pampered Chef for a snowman cake made using the classic batter bowl, the small batter bowl, and a prep bowl. I, however, didn't want to make such a huge cake (since I'm already making about a zillion other sweets for December and Christmas) so instead, I used about half the cake batter (from a box - come on, I'm busy) and made it with the small batter bowl (1 1/2 cups batter) and two prep bowls (1/2 cup batter and 1/4 cup batter). This left me with enough batter to also make 11 cupcakes, which I took to the school for a PTA function. Worked out well.

DSCF8744

I'm pleased with the snowman - he's got licorice for his mouth, nose, and scarf; chocolate chips for eyes; junior mints for buttons; candles for arms (she's 2 so it worked out perfectly); and half an oreo and a marshmallow, dipped in chocolate flavored almond bark for his hat. It turned out very nicely, and Erica was kind enough to make a little sign that says Happy Birthday.

DSCF8757

Little Torpedos

My first attempt at batards (little torpedos) was a great success! While I think I should have slashed a little deeper when I scored the loaves, overall the results were fantastic. I hadn't been brave enough to try a steam bath, or hearth bread, or batards until today for a whole host of reasons. But I grit my teeth and off I went, with results I'm very proud of. I used my cast iron pan as the steam pan (putting it under the stoneware pan as I didn't think it'd fit on top) and used my peel (which I have decided I love) to put the loaves (and the parchment paper I proofed them on) onto the baking stone after the oven and pans had preheated for the better part of 40 minutes.

DSCF8553

I did end up cooking the loaves for about 5 minutes less than the minimum time suggested in the formula.

DSCF8556

Sourdough Bagels

Sourdough Bagels

Bagels are one of the (many) bread-foods I have been trying to perfect. I LOVE bagels, and as with all foods that I love, I figure if I make it myself it will be healthier and less expensive for me to eat it, give me more options for variety and experimentation, and teach me good uses for my food storage. (This is usually, though not always, the case.) So I've made several attempts to produce good looking and great tasting bagels. I have had more flops than successes in this endeavor, including several batches of wrinkly bagels that nobody would eat but me (and the only reason I ate them is because I have a thing about wasting food). I did have success when I baked with my sister earlier this year but I had yet to meet with success on my own.

DSCF8354DSCF8358

I used the bagel recipe from The Bread Baker's Apprentice (one of my two favorite books for bread recipes) and modified it (per his instructions) to use the sourdough I received a few weeks ago from my friend Hans. I was very pleased with the resulting bagels. I think I'd cook them a little longer next time as they were very pale (only on top - the bottoms were nicely browned thanks to my baking stone), but otherwise I followed the recipe pretty much exactly.

DSCF8357

I used cheddar cheese, sesame seeds, dehydrated onions, and salt as toppings. Instead of making 12 big bagels or 24 mini bagels, I compromised and made 18 medium sized bagels. They are good sized - not too big but not too small. They worked out to be about 3 oz each.

DSCF8360

Kimball and the kids enjoyed them. I think Erica and Cambria each ate a whole bagel, while Isaac ate half. I finished one by myself and Kimball ate 1 1/2. I had another for lunch as a sandwich - they are a great size for that.

DSCF8359

I was impressed that my family ate them so well, especially considering the fact that Kimball claims not to like sourdough bread all that well. I happen to love it, so I'm thrilled that they like these bagels. I'll definitely be making them again.

DSCF8353

What a "Hoot"!

Here's a super-cute project that, while time consuming, is very fun and relatively easy to make. I used a cake mix (from the box) but changed it, as per the instructions in the back of the Hello, Cupcake! book this recipe comes from. In spite of the warning in the book about not using a mix with pudding, that's what I used because it was all I had on hand. Also, I used whole milk and lemon juice instead of buttermilk, again because it was what I had on hand. The cupcakes domed nicely and were very sturdy. One box made enough cupcakes to have 12 large and 24 mini owls.

Many thanks to Kimball, who split the eyes for me. I'd suggest actually buying Oreos instead of a knockoff (which is, unfortunately, what I did). The mini Oreos came apart very easily, but the large cookies weren't Oreos and they were a pain in the neck to separate!

DSCF8215

DSCF8211

Tex-Mex Burger Quesadillas

Well, I did finally get around to trying out the flour tortilla recipe I was hoping to make. I think the tortillas taste great, though they are a bit small (6" round or so) and, as has been my finding thus far with all the flour tortilla recipes I've tried, a little hard to roll out. If I try to roll them out thinner so they are bigger (what I'm going for here is 8 or 9 inch round), they end up folding on themselves when I put them in the pan, and then all is lost! As soon as they hit the cast iron they start cooking, so you have a tortilla that looks more like a handkerchief that somebody dropped on the ground than something you would use to wrap up your taco meat. They still taste great, but look a little stupid. What I really need is someone who is actually experienced at this to show me how to make them! Or to quit trying to make them thin and just have really huge but FAT tortillas. I guess that's a toss-up.

At any rate, here's what they looked like. I made Tex-Mex Burger Quesadillas out of them, and they turned out fairly decent. In the first picture, you can see the one on the top right was a little over-done. That was the first one, and I realized quickly that my pan was WAY too hot. Turned it down in a hurry and the rest came out much lighter.

Everybody liked them and Kimball was especially pleased with the tortilla shells. He didn't know they were home-made until I told him. :)

DSCF8143

DSCF8144

Whole Wheat Bread, Take 2

We ran out of our stumpy loaves of whole wheat bread last week, so I made some more. It went fairly well, though I'm still not ready to call it great.

Big Loaf BakedSmall Loaf Baked

I did make a few modifications from my previous attempt:

1) More water. This was mostly by accident. I added probably an extra 2-3 oz of water. Then, because I didn't want to grind more flour, I didn't add any extra flour to offset the extra water. This meant the dough was rather more wet than I would have liked, but I figured this bread was a work in progress and I could stand to have an over-wet loaf to see how it would perform.

pastedgraphic-13_textmediumbread_unbaked_2_textmediumbread_unbaked_3_textmedium

2) Less rising time. This time I didn't let it rise forever. Instead, I put it in when the dough was ready to bake, which did work out to be about 90 minutes after shaping.

pastedgraphic-16_textmediumbig_loaf_side_view_textmedium

3) I made one large loaf in my big pan and 1 small loaf in my mini loaf pan. The mini loaf weighed about 6 1/2 oz when I portioned it. I was shooting for 9 oz, but figured that was close enough.

I still wasn't terribly happy about the height of the loaf, though it was certainly better than last time. I'm still not convinced my loaf pan is 1.5 lb and I may try the whole recipe in the pan next time, just to see if I can get it nice and high like I want. My pan does have rather wide and sloped sides so it is spreading out quite a bit. Also, I think that since the dough was so wet it looked like it may have spread a little more than I liked. That's a terrible description of what I actually saw but I can't figure out how to describe what it did. It was almost like the top around the edges was bubbly or something. :)

So anyway - we'll eat this loaf and I'll try again. It still tastes great, in spite of the visual problems. As always, a work in progress.

Big Loaf Baked 2Small Loaf Top View

Wheatballs

Erica has been asking me for a few weeks if we could please have spaghetti and meatballs for dinner. I haven't made meatballs in a VERY long time because when it comes to cooking with meat, I'm cheap and I hate making things that call for lots and lots of meat. But, ever trying to please my family at dinnertime, I decided to look around a bit and see if I could find a good "meatball" solution. I know wheat can be used as a meat extender, so I searched online and found this recipe for meatballs.

While I don't know that I'd go so far as to call them "the best" like the name states, they were pretty good and Erica was very pleased, polishing off at least 4 meatballs. Isaac (who is not really a big meat eater) ate half of one and announced he didn't really want a meatball after all, and Cambria ate a few bites of hers before starting a food fight with the kitchen floor. Kimball said he liked them "as long as you know to expect the wheat," but I didn't really notice it. I think probably had I used cracked bulgur he would have noticed it less, but since I tried and failed to crack my (homemade) bulgur, we just used it whole.

Ok - as promised, here are the modifications I made to the recipe: it calls for 4 oz of ground beef and 4 oz of Italian sausage - I used 8 oz of ground beef, as my family isn't fond of Italian sausage and I didn't have any on hand. I used 1 whole egg instead of 2 egg whites (using just the whites would have been healthier, but I hate to waste the yolks because I'd just have to trash them). I used 1/3 cup wheat berries to make bulgur so we ended up with a bit more bulgur (and I decided to use it all in the recipe). I also used more hot water (and actually boiled the water and bulgur rather than just letting them soak). Instead of whole wheat bread crumbs I opened up the freezer and found a bag of 4 1/2 hot dog buns and another bag containing 1 hamburger bun that we'll probably never use. I tore those up and dried them out a bit after defrosting, and made bread crumbs out of that. Seemed to work pretty well, though it made 2 cups of crumbs so I think I'll try and make another batch of meatballs this week and freeze them for another day.

DSCF8076DSCF8077

Whole Wheat Bread

I gave the whole wheat bread recipe in The Bread Baker's Apprentice by Peter Reinhart another shot yesterday. My previous attempt while visiting my sister was mediocre, but I thought I'd give it another shot because I really want to find a great wheat bread recipe and I was sure I could improve on my past experience by making a few important changes.

The last time I made this loaf it turned out dense and small, though with a decent flavor. I have since spent a lot of time looking at the recipe and thinking about what I might have done incorrectly. I came up with three mistakes that I wanted to correct: 1) the recipe calls for some coarsely ground whole wheat flour, and we used finely ground whole wheat flour in its place; 2) the recipe calls for instant yeast and we were using active dry yeast, so we increased the amount of yeast by 25% but neglected to activate the yeast before adding it; and 3) as we were kneading we added extra flour to keep the dough from sticking to our hands.

On Friday the last of the most previous loaf of Light Wheat Bread (also from the Reinhart book) was finished up, so I whipped out my wheat grinder and ground up the required amount of wheat for the Whole Wheat Bread recipe, using my kitchen scale to accurately measure the wheat. I ground some on what my grinder says is "coarse" (it looked about the same to me, but I didn't inspect it terribly closely) and the rest as finely as my grinder will grind. I made the soaker and poolish, remembering to activate my yeast before adding it to the poolish, and let them rest overnight. The next day I mixed up the rest of the ingredients, again activating the yeast before adding it. I added no extra flour, and in fact added a little more water while kneading. Instead of flouring my hands and my kneading surface, I used wet hands (this is an amazing trick (thanks, Hans) - the dough won't stick to your hands if they are wet which I never would have thought of). The dough easily and quickly passed the windowpane test, and so I let it rise. After it had risen I divided the dough into 2 equal parts (each roughly 18 oz) and formed them into loaves, placing them in my pans.

This is where things started to go south.

The recipe says it makes two 1-lb loaves, and so I dutifully placed each of my formed loaves in its own loaf pan. What I didn't know was that my loaf pans are NOT 1-lb loaf pans. Apparently they are more like 1.5 lb loaf pans, or possibly 2 lb (though my bread mentor says most likely they are 1.5 lb pans). I followed the instructions in the recipe, waiting for my bread to "crest above the lip of the pan". I waited the specified 90 minutes without the loaf rising nearly this high, figured it must just be extra cold in my house, and kept on waiting. And waiting, and waiting, and waiting. Unfortunately, I waited so long that by the time I finally gave up and put the loaves in the oven, they were so over-proofed that they fell while baking. The picture below was taken just before putting them in the oven:

DSCF8062

Flat topped bread is not very pretty to look at.

DSCF8065DSCF8067

Fortunately for me, the loaves, while flat on top from falling and rather wide and stumpy from being in the wrong sized pan, still tasted wonderful. They were not dense, nor were they jaw-tiring to chew. The flavor was excellent (notice I say was - we've already polished off the first loaf) and my children and husband all enjoy the bread thoroughly. I'll be making this again, probably this week. But this time I'll be portioning the dough a bit differently. I think I'll make one loaf using about 3/4 of the dough and put it in my regular loaf pan and then use the remaining dough to make mini loaves (or one loaf, depending on how much dough is left). And I'll be going off the dough response instead of the height of the rise to know when to bake it.

Stay tuned. :)

Apple, Bacon, and Cheddar Quiche

I've never made quiche before, and actually didn't really even know what it was until I decided to make this one for dinner. Since I don't know what quiche is supposed to taste like, I have nothing to base my opinion on, but I thought it was pretty darn good. I made seasoned potato skins and biscuits topped with a very thin layer of honey to go with it, and it went over pretty well. Cambria ate as much as me again. Erica ate a little of hers but didn't seem to like the quiche or the biscuits much, though (surprise here - she hated them last time) she wanted more of the seasoned potatoes. Isaac ate all his quiche so he could have more biscuits, and Cambria ate all her quiche and two biscuits - again, more than me!

Kimball said my crust was perfect, which was a great accomplishment because until now I've never been able to get a nice flaky crust on anything. I always add too much water and knead it too much. So thanks, Jenni, for the tutorial whenever that was (Thanksgiving?). I apparently learned something. :)

Quiche 2Quiche

The biscuits were made from the recipe on the bisquick box (again I halved the recipe), but I didn't cut them into individual biscuits until after I cooked them. It took a bit longer to cook that way (maybe an extra 4 minutes or so) but they were done all the way through. I probably kneaded them a little long so they weren't as flaky as they could have been, but that could also have been from mixing up the dough about 20 minutes before I was ready to bake them. Also could have been because I made them from a mix instead of from scratch.

Biscuits 2

Modifications to the quiche recipe: I cut the entire recipe in half (including only making half a pie shell), mainly because I wasn't sure my family would eat it or enjoy it and I hate having tons left over that nobody will eat but me. I don't have half and half, and honestly didn't even really know what it is, but I substituted 1/2 cup reconstituted dry milk and 1/2 cup heavy whipping cream for the 1 cup half and half. (I have since learned that half and half is a mixture, 1 to 1 ratio, of whole milk and cream so my substitution was pretty close.) I also used up the rest of the reconstituted apples left over from the Mini Tarts I made on Monday instead of cutting up fresh ones. Instead of using a 9" pie pan I used a smaller pan (it holds about 5 cups water) with straight sides. I got the crust in there and then regretted it because I wasn't sure the pieces would lift out without munching the crust, but they came out beautifully. Also, it says to cook it to an internal temperature of 165 but no more than 185. I don't have an instant read probe thermometer so instead I cooked mine until a knife inserted in the center came out clean (as per my Betty Crocker instructions) and it took about the 45 minutes the recipe claims.

Baked Chicken Cheese Enchiladas

These were ok, but not wonderful. They gave me a touch of heartburn which is always a bummer. Isaac ate his and Erica ate most of hers, but Cambria only picked at her plate. Kimball said it was pretty good, especially the corn tortillas which he says he normally doesn't like. Unfortunately (because this means I'll be eating enchiladas every day for a week), even though I didn't make the full recipe, we still have a ton of leftovers. The fresh corn on the cob was the saving grace of the meal. :)

plate_textmediumenchiladas_in_the_pan_4_textmediumenchiladas_in_the_pan_5_textmedium

Modifications to the enchilada recipe: I used ten 6.5" corn tortillas instead of twelve 8" (because my new tortilla press is 6.5" not 8"), and I halved the rest of the ingredients. I may have had a touch more chicken than a cup, but it was pretty close. As always, I used low-fat cream cheese and low-fat sour cream instead of the regular stuff. I baked at 350 instead of the 325 it calls for only because I didn't notice it said 325. :)

tortillas in the warmer

The corn tortilla recipe was wonderful, especially the instructions. (You can read about my tortilla making experience here.) I probably added close to 1/2 cup extra hot water.

Baked Potato Soup

Tonight's dinner was a repeat from several months ago. I liked it so much we had it again. Also, it leaves potato peels which I love to season and bake as a side dish (that the kids don't really like but I love and Kimball likes). So we had it again and Kimball took some pictures for me. The recipe calls for 2% milk but I used skim. I used regular medium cheddar cheese instead of the reduced fat extra sharp cheddar. However, if I had extra sharp cheese I would have used it - I think it would taste very good with this soup. The only other variance is that it took my flour/milk mixture more like 20 minutes to thicken and bubble, instead of the 8 minutes the recipe claims. Maybe if I warmed the milk in the microwave before adding it to the flour it would take less time.

Responses from the kids: Isaac ate his, Erica ate hers and said she loved it, and Cambria ate more than I did! Another success - two nights in a row is pretty good for our house. :)

Baked Potato Soup

Mini Tarts

After visiting my sister and learning how to make a tart, I was inspired to buy my own tart pan. In fact, I bought a regular sized tart pan and then 6 mini tart pans so I could make individual tarts. I made a yummy tart for Family Home Evening treats this past Monday, and they were a hit. Not as beautiful as I would have liked, since my berries were a little smashed (they were leftovers from when we had blackberry crepes so they had seen the back side of a serving spoon) and the apple slices were re-hydrated from the dried apple slices I have in my food storage. Also, the recipe called for apple jelly which I didn't have, so I used strawberry jelly instead. It colored everything red (imagine that) and also had chunks of strawberries in it. But really, it tasted great anyway, even with the less than pleasing presentation. And they weren't bad looking, just not catering-worthy by any stretch. This recipe came from my Betty Crocker cookbook, and I did modify it a bit by using low-fat cream cheese and low-fat sour cream. I also put only 1/4 cup of jelly on instead of the 1/3 cup it called for.

My oldest child ate all hers and had the leftover tart for a snack the next day. My middle child ate most of the filling from his and part of the shell (he's really not a sweets kid though), and the baby ate all hers and probably would have shared the leftover one, had she been awake.

DSCF7912

White Spaghetti

This one got great reviews from my kids. I believe there was a "Thanks for making dinner, mom, this is great!" in there somewhere. The kids ate it up, and Kimball enjoyed it as well. I thought it was good, though maybe could have used a bit more cheese than I put on it. I did make a few modifications: I used only about 1/4 cup + 1 Tbsp oil (canola, not olive, because my olive oil isn't open yet and the canola oil is), and I sprinkled canned Parmesan cheese (didn't use any Romano) on top but didn't measure. I'd guess maybe 3 Tbsp. I also sprinkled on some fresh parsley for good measure since I have TONS of that. Oh and it calls for 1 lb of spaghetti but I only used 12 oz. It was enough for the 5 of us (we had this stuff and then half-slices of my latest attempt at sandwich bread) and then the two little ones ate the rest today for lunch. Also, it calls for 1/2 onion to be cooked with the spaghetti. I assumed this meant chop up the onion and put it in the pot with the spaghetti while it's boiling. I was a little concerned about it coming out the holes in my strainer when I drained the spaghetti, but as far as I could tell we were ok there.

Find the recipe here for this dish, called "Spaghetti Aglio E Olio"

DSCF7916

Cooking with my Sister

I went to visit my sister over Labor Day weekend and we did some baking. We made 100% Whole Wheat Bread from the book The Bread Baker's Apprentice by Peter Reinhart, as well as whole wheat bagels and a blackberry tart. Here are some pictures.

amazing_chefs_textmediumtart2_textmediumtart_textmedium

The tart turned out wonderfully. We made it with some blackberries we had picked earlier that weekend. The artistic drops were the blackberry juice. It wasn't thick enough to drizzle really, and just spilled out on the plate. Next time I'd probably thicken it a bit with some corn starch. I don't know if that'd work or not, or if it'd taste good either. :)

lunchtime_textmediumpastedgraphic-5_textmedium

The bagels were very tasty, though they were a bit big (per the recipe - it called for making 6 but we should have made 9 or 10). About half of a large one (the picture shows a medium sized one) was plenty for me for a sandwich. These inspired me to buy sesame seeds to use here at home. I haven't used them yet, but I will.

The bread (apparently I don't actually have a picture of the bread we made), while it tasted fine, was dense and small. We should have given it more time to rise I suppose. Or maybe used a scale to measure the flour. Or possibly activated the yeast. Hard to say on that one. We never did get it to properly pass the windowpane test, though we exhausted ourselves (and her husband) trying. :)